Competition Drama’s
I thought I would you take you through the trials and tribulations of the competition quilt I am just in the process of binding ready to deliver for the Festival of Quilts at the NEC.
It all started with a discussion on Facebook between a few of my friends who were pushing me to enter a competition after a few of them had entered one or two and some had been very successful. I have never been one for entering competitions, I just feel that so much hangs on the likes and dislikes of a couple of people who, being human, may have their own ideals and favourite methods or styles, and if your quilt does not fit into any of them, it will do nothing. Yet it could be an absolutely fabulous quilt. How many times have you been to a competition and looked at some of the winners and some of the quilts that have not been deemed to reach the standard and wondered why, as those quilts can be stunning, and many of them I prefer compared to the winners. But maybe this goes back to being human with preferences.
Having said all this, I had my arm twisted firmly up my back and I accepted the challenge to produce something completely out of my comfort zone and enter the Quilters Guild themed category, ‘In my garden’.
I had taken a photo of a gate I had seen in the grounds of a hotel and thought that the iron work would make a lovely quilting design, didn’t for one minute think it would be the theme of a quilt, but wanted to do something different. So I set too and started to draw out the gate. I had no idea how big it was going to be at this stage, I just let it develop as it went along.
It soon became obvious that this was going to be a wholecloth or even a painted wholecloth, neither of which I have ever done before, so this was definitely going to be outside my comfort zone. As the drawing of the gate progressed I decided that it needed to be attached to a grand pillar at the side. The pillar on its own looked boring and bland, and to be honest didn’t fit with the period that the original gate came from, it needed something adding to it. My darling dad gave me a handbook of ornament which has illustrations from many time periods within in it and one urn stood out to me as absolutely fitting with the period and the gate with just a few tweeks.
![IMG_0695[1]](http://www.capricornquilting.co.uk/wp-content/uploads/2014/07/IMG_06951-1024x768.jpg) So now I had the gate, the pillar and the urn, all on separate layers of tracing paper, but the original picture had ivy growing around it and through it, and almost caressing it really, so I had to include this aspect as well so out came another few sheets of tracing paper and I began to add the vines first and then the leaves on yet another layer of paper. I did it this way so that if I had to change elements I could do it easily whilst keeping the aspects I was happy with.
So now I had the gate, the pillar and the urn, all on separate layers of tracing paper, but the original picture had ivy growing around it and through it, and almost caressing it really, so I had to include this aspect as well so out came another few sheets of tracing paper and I began to add the vines first and then the leaves on yet another layer of paper. I did it this way so that if I had to change elements I could do it easily whilst keeping the aspects I was happy with.
![IMG_0794[1]](http://www.capricornquilting.co.uk/wp-content/uploads/2014/07/IMG_07941-1024x768.jpg) As you can see, I use a lightbox so that I can see through all the layers easily and draw in what I need. When I am happy with all the layers I transfer it all onto one set of sheets so that I have the full picture traced out ready to put the fabric on top and transfer it to that.
t
As you can see, I use a lightbox so that I can see through all the layers easily and draw in what I need. When I am happy with all the layers I transfer it all onto one set of sheets so that I have the full picture traced out ready to put the fabric on top and transfer it to that.
t![IMG_0796[1]](http://www.capricornquilting.co.uk/wp-content/uploads/2014/07/IMG_07961-1024x768.jpg) This show the final image being transfered to the last set of tracing sheets. The next thing to do was decide what the borders were going to be like. They had to be in keeping with the theme so I again went to my trust reference books and found one that was almost perfect, and again just needed a few tweeks and then it was ready to put on the fabric.
This show the final image being transfered to the last set of tracing sheets. The next thing to do was decide what the borders were going to be like. They had to be in keeping with the theme so I again went to my trust reference books and found one that was almost perfect, and again just needed a few tweeks and then it was ready to put on the fabric.
![IMG_0931[1]](http://www.capricornquilting.co.uk/wp-content/uploads/2014/07/IMG_09311-1024x768.jpg) And here it is, ready to go.
So fabric ontop, tracing done and then it was onto the frame for the quilting to begin. Because all the threads have to be knotted and buried individually it soon became like spaghetti junction on the frame. I was beginning to wonder what I had done saying I was going to do this, but I had started it, and it is not in my nature to give in to anything, and I wanted to prove to myself that I could do it. So I plod on.
And here it is, ready to go.
So fabric ontop, tracing done and then it was onto the frame for the quilting to begin. Because all the threads have to be knotted and buried individually it soon became like spaghetti junction on the frame. I was beginning to wonder what I had done saying I was going to do this, but I had started it, and it is not in my nature to give in to anything, and I wanted to prove to myself that I could do it. So I plod on.
![IMG_0938[1]](http://www.capricornquilting.co.uk/wp-content/uploads/2014/07/IMG_09381-1024x768.jpg)
![IMG_0956[1]](http://www.capricornquilting.co.uk/wp-content/uploads/2014/07/IMG_09561-1024x768.jpg) There were times when I loved this quilt, and days when I hated it, but I was determined to finish it. In the beginning I started to count the number of threads knotted and buried but I lost count at just over 400 and was not going to go back and start counting again, and I had just really started the vines at that point. As the stems and the leaves were different colours, each tiny segment of vine had four stop/starts each and each leaf had its own pair as well. By the time I had finished the picture part of the quilt it literally had my blood, sweat and tears in it.
I began to feel under pressure as the deadline was getting closer and I seemed to have soooo much left to do. I began to doubt that I would finish it and even if it I did finish it, I didn’t think it would look right. My group was very encouraging, and I have recently read a blog written by one of them. At the time I was going through a rough patch and wanting to give up. She said she wanted to shake me, as I had pushed my boundaries and strove forwards and believes that I am good at this and believes in me. This gave me a bit of a boost and I carried on with it.
There were times when I loved this quilt, and days when I hated it, but I was determined to finish it. In the beginning I started to count the number of threads knotted and buried but I lost count at just over 400 and was not going to go back and start counting again, and I had just really started the vines at that point. As the stems and the leaves were different colours, each tiny segment of vine had four stop/starts each and each leaf had its own pair as well. By the time I had finished the picture part of the quilt it literally had my blood, sweat and tears in it.
I began to feel under pressure as the deadline was getting closer and I seemed to have soooo much left to do. I began to doubt that I would finish it and even if it I did finish it, I didn’t think it would look right. My group was very encouraging, and I have recently read a blog written by one of them. At the time I was going through a rough patch and wanting to give up. She said she wanted to shake me, as I had pushed my boundaries and strove forwards and believes that I am good at this and believes in me. This gave me a bit of a boost and I carried on with it.
![IMG_0993[1]](http://www.capricornquilting.co.uk/wp-content/uploads/2014/07/IMG_09931-1024x768.jpg)
![IMG_0997[1]](http://www.capricornquilting.co.uk/wp-content/uploads/2014/07/IMG_09971-1024x768.jpg) Individual tiny stem sections.
Individual tiny stem sections.
![IMG_1003[1]](http://www.capricornquilting.co.uk/wp-content/uploads/2014/07/IMG_10031-1024x768.jpg)
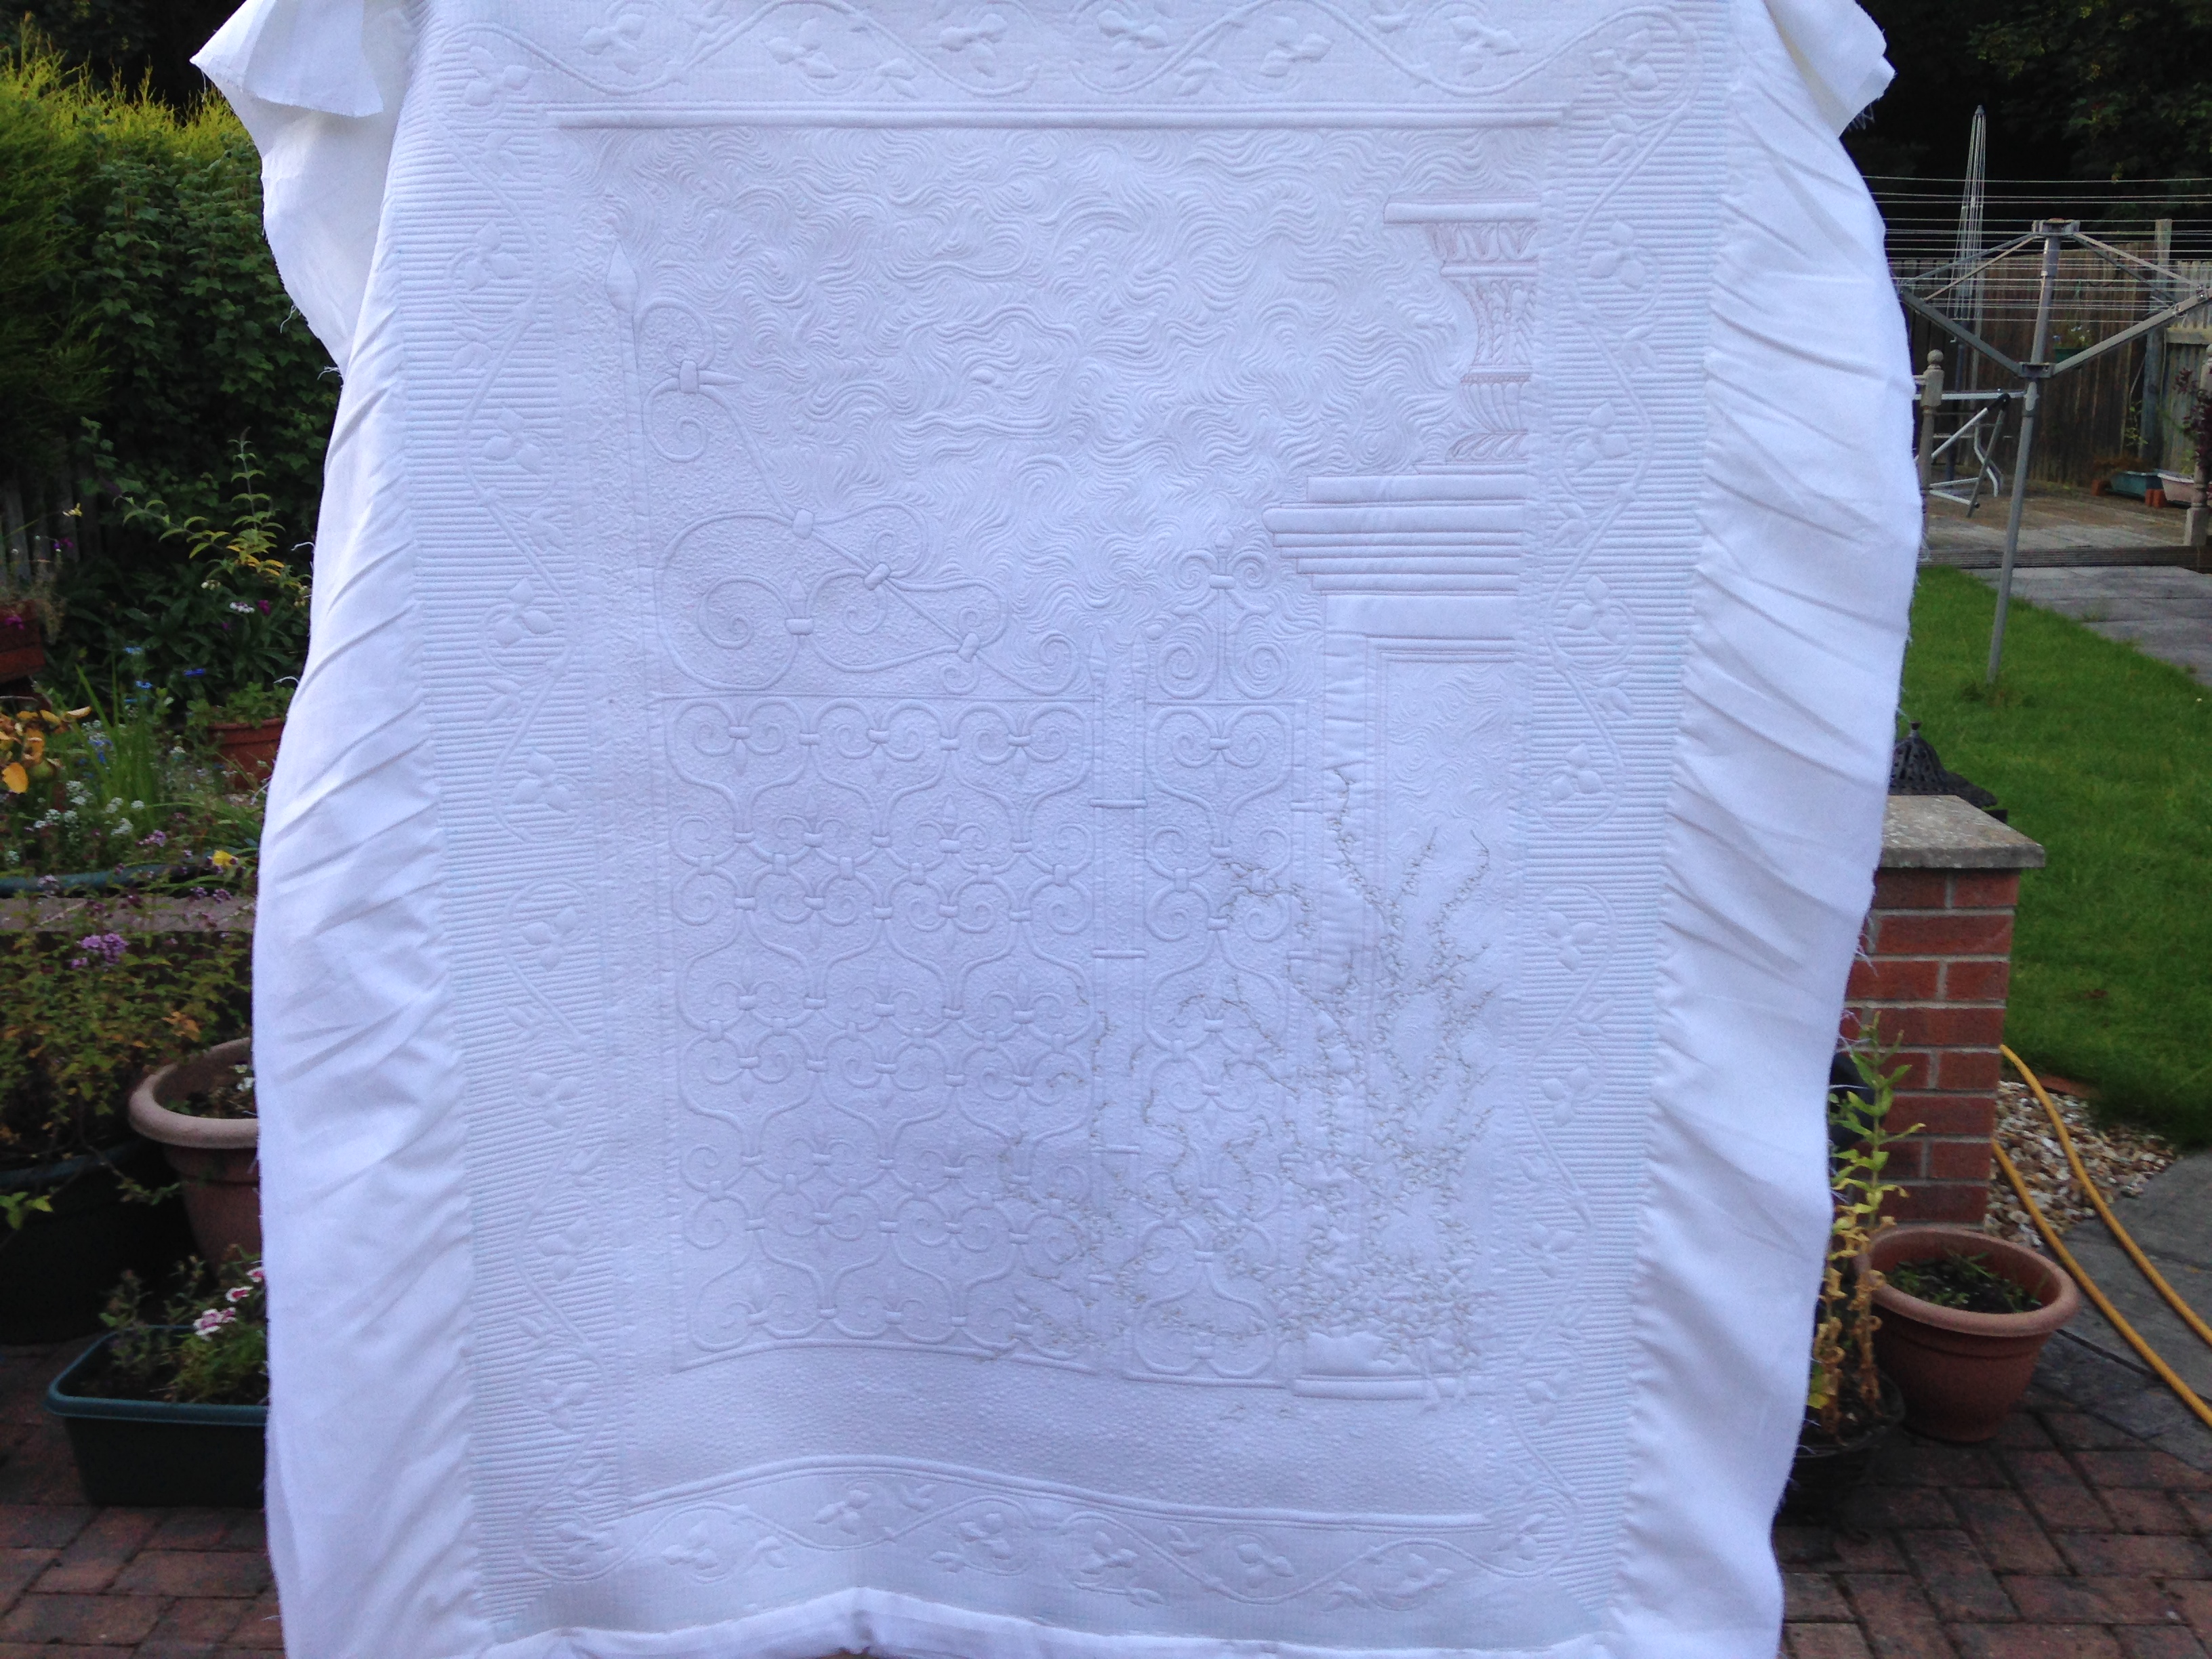
![IMG_1006[1]](http://www.capricornquilting.co.uk/wp-content/uploads/2014/07/IMG_10061-1024x768.jpg) And finally it is done, well all except the rinsing, blocking and binding. (My poor son is behind this on his tip toes so that it doesn’t touch the floor)
And finally it is done, well all except the rinsing, blocking and binding. (My poor son is behind this on his tip toes so that it doesn’t touch the floor)
![IMG_1053[1]](http://www.capricornquilting.co.uk/wp-content/uploads/2014/07/IMG_10531-1024x768.jpg) It has been a fascinating personal journey doing this quilt. I have learnt a lot about this style of quilting and a lot about myself and that nothing is impossible, you just have to get there step by step. When I first finished it, I was despondent about it, I don’t feel that it is my best work, but in retrospect, it is the first time I have done this style of quilting, and the next one will be a lot better, and the one after that better still. I will take what I have learnt and build on it and grow from it. If you get to the Festival of Quilts, have a look at it and let me know what you think. I hope you will like it, but I know you will like the next one even more.
Until the next time, keep quilting and stay safe out there.
It has been a fascinating personal journey doing this quilt. I have learnt a lot about this style of quilting and a lot about myself and that nothing is impossible, you just have to get there step by step. When I first finished it, I was despondent about it, I don’t feel that it is my best work, but in retrospect, it is the first time I have done this style of quilting, and the next one will be a lot better, and the one after that better still. I will take what I have learnt and build on it and grow from it. If you get to the Festival of Quilts, have a look at it and let me know what you think. I hope you will like it, but I know you will like the next one even more.
Until the next time, keep quilting and stay safe out there.
![IMG_0695[1]](http://www.capricornquilting.co.uk/wp-content/uploads/2014/07/IMG_06951.jpg) So now I had the gate, the pillar and the urn, all on separate layers of tracing paper, but the original picture had ivy growing around it and through it, and almost caressing it really, so I had to include this aspect as well so out came another few sheets of tracing paper and I began to add the vines first and then the leaves on yet another layer of paper. I did it this way so that if I had to change elements I could do it easily whilst keeping the aspects I was happy with.
So now I had the gate, the pillar and the urn, all on separate layers of tracing paper, but the original picture had ivy growing around it and through it, and almost caressing it really, so I had to include this aspect as well so out came another few sheets of tracing paper and I began to add the vines first and then the leaves on yet another layer of paper. I did it this way so that if I had to change elements I could do it easily whilst keeping the aspects I was happy with.
![IMG_0794[1]](http://www.capricornquilting.co.uk/wp-content/uploads/2014/07/IMG_07941.jpg) As you can see, I use a lightbox so that I can see through all the layers easily and draw in what I need. When I am happy with all the layers I transfer it all onto one set of sheets so that I have the full picture traced out ready to put the fabric on top and transfer it to that.
t
As you can see, I use a lightbox so that I can see through all the layers easily and draw in what I need. When I am happy with all the layers I transfer it all onto one set of sheets so that I have the full picture traced out ready to put the fabric on top and transfer it to that.
t![IMG_0796[1]](http://www.capricornquilting.co.uk/wp-content/uploads/2014/07/IMG_07961.jpg) This show the final image being transfered to the last set of tracing sheets. The next thing to do was decide what the borders were going to be like. They had to be in keeping with the theme so I again went to my trust reference books and found one that was almost perfect, and again just needed a few tweeks and then it was ready to put on the fabric.
This show the final image being transfered to the last set of tracing sheets. The next thing to do was decide what the borders were going to be like. They had to be in keeping with the theme so I again went to my trust reference books and found one that was almost perfect, and again just needed a few tweeks and then it was ready to put on the fabric.
![IMG_0931[1]](http://www.capricornquilting.co.uk/wp-content/uploads/2014/07/IMG_09311.jpg) And here it is, ready to go.
So fabric ontop, tracing done and then it was onto the frame for the quilting to begin. Because all the threads have to be knotted and buried individually it soon became like spaghetti junction on the frame. I was beginning to wonder what I had done saying I was going to do this, but I had started it, and it is not in my nature to give in to anything, and I wanted to prove to myself that I could do it. So I plod on.
And here it is, ready to go.
So fabric ontop, tracing done and then it was onto the frame for the quilting to begin. Because all the threads have to be knotted and buried individually it soon became like spaghetti junction on the frame. I was beginning to wonder what I had done saying I was going to do this, but I had started it, and it is not in my nature to give in to anything, and I wanted to prove to myself that I could do it. So I plod on.
![IMG_0938[1]](http://www.capricornquilting.co.uk/wp-content/uploads/2014/07/IMG_09381.jpg)
![IMG_0956[1]](http://www.capricornquilting.co.uk/wp-content/uploads/2014/07/IMG_09561.jpg) There were times when I loved this quilt, and days when I hated it, but I was determined to finish it. In the beginning I started to count the number of threads knotted and buried but I lost count at just over 400 and was not going to go back and start counting again, and I had just really started the vines at that point. As the stems and the leaves were different colours, each tiny segment of vine had four stop/starts each and each leaf had its own pair as well. By the time I had finished the picture part of the quilt it literally had my blood, sweat and tears in it.
I began to feel under pressure as the deadline was getting closer and I seemed to have soooo much left to do. I began to doubt that I would finish it and even if it I did finish it, I didn’t think it would look right. My group was very encouraging, and I have recently read a blog written by one of them. At the time I was going through a rough patch and wanting to give up. She said she wanted to shake me, as I had pushed my boundaries and strove forwards and believes that I am good at this and believes in me. This gave me a bit of a boost and I carried on with it.
There were times when I loved this quilt, and days when I hated it, but I was determined to finish it. In the beginning I started to count the number of threads knotted and buried but I lost count at just over 400 and was not going to go back and start counting again, and I had just really started the vines at that point. As the stems and the leaves were different colours, each tiny segment of vine had four stop/starts each and each leaf had its own pair as well. By the time I had finished the picture part of the quilt it literally had my blood, sweat and tears in it.
I began to feel under pressure as the deadline was getting closer and I seemed to have soooo much left to do. I began to doubt that I would finish it and even if it I did finish it, I didn’t think it would look right. My group was very encouraging, and I have recently read a blog written by one of them. At the time I was going through a rough patch and wanting to give up. She said she wanted to shake me, as I had pushed my boundaries and strove forwards and believes that I am good at this and believes in me. This gave me a bit of a boost and I carried on with it.
![IMG_0993[1]](http://www.capricornquilting.co.uk/wp-content/uploads/2014/07/IMG_09931.jpg)
![IMG_0997[1]](http://www.capricornquilting.co.uk/wp-content/uploads/2014/07/IMG_09971.jpg) Individual tiny stem sections.
Individual tiny stem sections.
![IMG_1003[1]](http://www.capricornquilting.co.uk/wp-content/uploads/2014/07/IMG_10031.jpg)
![IMG_1006[1]](http://www.capricornquilting.co.uk/wp-content/uploads/2014/07/IMG_10061.jpg) And finally it is done, well all except the rinsing, blocking and binding. (My poor son is behind this on his tip toes so that it doesn’t touch the floor)
And finally it is done, well all except the rinsing, blocking and binding. (My poor son is behind this on his tip toes so that it doesn’t touch the floor)
![IMG_1053[1]](http://www.capricornquilting.co.uk/wp-content/uploads/2014/07/IMG_10531.jpg) It has been a fascinating personal journey doing this quilt. I have learnt a lot about this style of quilting and a lot about myself and that nothing is impossible, you just have to get there step by step. When I first finished it, I was despondent about it, I don’t feel that it is my best work, but in retrospect, it is the first time I have done this style of quilting, and the next one will be a lot better, and the one after that better still. I will take what I have learnt and build on it and grow from it. If you get to the Festival of Quilts, have a look at it and let me know what you think. I hope you will like it, but I know you will like the next one even more.
Until the next time, keep quilting and stay safe out there.
It has been a fascinating personal journey doing this quilt. I have learnt a lot about this style of quilting and a lot about myself and that nothing is impossible, you just have to get there step by step. When I first finished it, I was despondent about it, I don’t feel that it is my best work, but in retrospect, it is the first time I have done this style of quilting, and the next one will be a lot better, and the one after that better still. I will take what I have learnt and build on it and grow from it. If you get to the Festival of Quilts, have a look at it and let me know what you think. I hope you will like it, but I know you will like the next one even more.
Until the next time, keep quilting and stay safe out there.


